Welcome to the third leg of our journey. We have built the bones of a webpage with HTML, given it skin and clothes with CSS, and now it is time to give it muscles, reflexes, and a brain. That last part is JavaScript.
JavaScript is the programming language that runs inside your browser. Every time a webpage reacts to a click, fetches new data, animates something, or updates without reloading, JavaScript is almost certainly involved. It is, by a comfortable margin, the most popular programming language in the world — partly because the web needs it, partly because it is surprisingly forgiving to beginners.
To recap our earlier analogy: if HTML is the nouns (what is on the page) and CSS is the adjectives (how it looks), JavaScript is the verbs — what the page does. And once you can write verbs, you can write whole sentences. Eventually whole paragraphs, whole stories, whole applications.
Hello, browser
Before we write a single file, let us meet the browser console. Right-click anywhere on any webpage, choose "Inspect" (or "Inspect Element"), and look for a tab called Console. That little box is a playground where you can type JavaScript and have it run instantly. It is the fastest way to experiment, and you will use it constantly.
Type this into the console and press Enter:
alert("Hello, world!");
A popup will appear saying "Hello, world!". Close it. Now type this:
console.log("Hello, world!");
Nothing pops up this time, but if you look at the console, you will see "Hello, world!" printed there. console.log is the developer's best friend — it is how you ask the browser to show you what is happening inside your code. Whenever something is not working the way you expect, the first thing to do is sprinkle a few console.log calls around the suspicious area and see what is actually happening.
Congratulations: you have just written your first JavaScript. The hard part of starting is over.
Variables and values
A variable is a name you give to a piece of information so you can use it later. You create one with let or const:
let name = "Mango";
const year = 2026;
let count = 0;

count = count + 1;
console.log(name, year, count);
The rule is simple. Use let when the value will change later (like count in the example above). Use const when it will not (like year). Try to use const by default and reach for let only when you actually need to reassign. This makes your code easier to reason about — when you see const, you know that variable will always be exactly what it is right now.
JavaScript has a few different kinds of values. Strings (text) live inside quotes. Numbers do not. Booleans are true or false. There is also null (intentionally empty) and undefined (not yet assigned). And there are more advanced ones we will meet later, like arrays (lists) and objects (collections of named values).
There is also a third keyword you might see in older code: var. It works like let but has some surprising scoping rules that trip up beginners. In modern JavaScript, just use let and const. Forget var exists.
Functions: reusable recipes
A function is a named recipe. You write the steps once, and then you can run them whenever you want, with whatever ingredients you want.
function greet(name) {
  return "Hello, " + name + "!";
}

console.log(greet("Mango"));   // Hello, Mango!
console.log(greet("World"));   // Hello, World!
The word function says "I am defining a recipe." greet is the name. (name) is the input — the ingredient. Inside the curly braces are the steps. return is the result the recipe spits out. Anything after the return does not run, so put it where it makes sense.
Once you have defined a function, you can call it as many times as you want, with different inputs each time. That is the whole point of functions: do not repeat yourself. Write the logic once, reuse it forever. Good code is mostly functions calling functions calling functions, with the deepest ones doing tiny, well-defined jobs.
There is a shorter way to write functions too, called arrow functions. The same greet function looks like this:
const greet = (name) => {
  return "Hello, " + name + "!";
};
Arrow functions do the same thing, just with less typing. Most modern JavaScript uses them. For a one-liner you can drop the braces and the return:
const greet = (name) => "Hello, " + name + "!";
Pick whichever style feels comfortable — they behave identically for now. As you read more code, you will see all three forms. The important thing is to recognise what they do.
The DOM: the page as a tree
Here is where JavaScript gets really interesting. When your browser loads an HTML file, it builds an in-memory representation of the page — a tree of every element, every attribute, every piece of text. That representation is called the DOM, short for Document Object Model.
The DOM is what JavaScript actually talks to. With JavaScript, you can reach into the DOM and change anything: rewrite text, swap colours, add new paragraphs, hide elements, show elements. Anything you can do in your HTML file, you can also do from JavaScript at runtime.
const heading = document.querySelector("h1");
heading.textContent = "I was changed by JavaScript";
heading.style.color = "#ff3d8a";
The first line asks the DOM: "give me the first <h1> on the page." The second line changes its text. The third line changes its colour. Reload the page and the changes are gone — because JavaScript only changes the live DOM, not the original HTML file on disk.
There are several ways to grab an element. document.querySelector("h1") returns the first element matching a CSS selector. document.querySelectorAll(".card") returns every element matching the selector, as a list. document.getElementById("hero") returns the one element with a particular id. Each form has its place.
Events and listeners
Static pages are nice, but the real magic is interactivity — the page reacting to what you do. JavaScript handles this through events. An event is anything the browser notices: a click, a key press, a mouse movement, a form submission, a page finishing loading.
To react to an event, you attach a listener to an element. A listener is just a function that runs whenever the event fires.
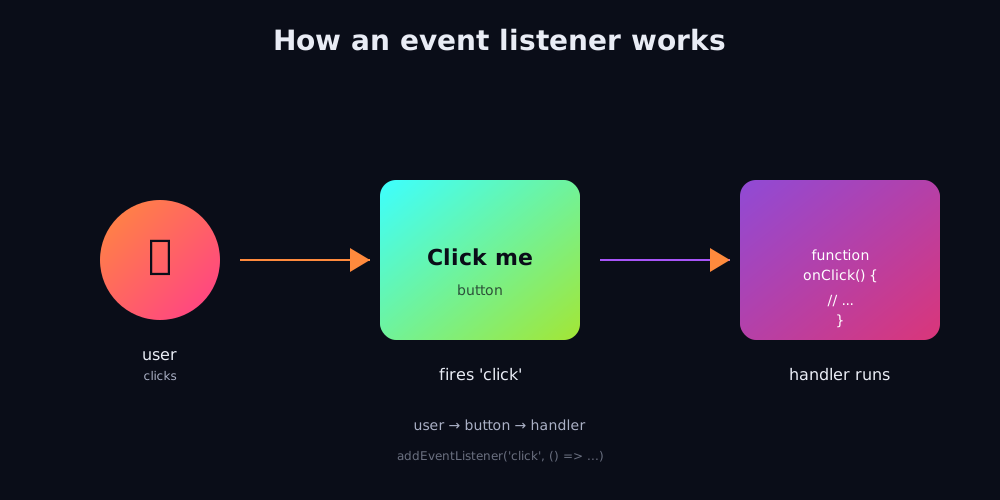
The flow is simple: the user does something, the browser fires an event, the listener function runs in response. Let us see it with a click:
const button = document.querySelector("#clickMe");
button.addEventListener("click", () => {
  console.log("The button was clicked!");
});
That tiny piece of code attaches a listener to a button. Every time the user clicks it, the message gets logged. You can attach multiple listeners to the same element, and you can attach them to any element, not just buttons. You can also remove listeners later with removeEventListener, though that is less common in small projects.
The most common events you will meet: click, input (when a user types in a field), submit (when a form is submitted), keydown (a key is pressed), mouseover (the cursor enters an element), and DOMContentLoaded (the page has finished loading). The MDN event reference has the full list.
A real example: a click counter
Let us put everything together and build a small but real interactive page. Save this as counter.html:
<!doctype html>
<html>
<head>
  <title>Click counter</title>
  <style>
    body { font-family: system-ui; padding: 2rem; }
    button { padding: 1rem 2rem; font-size: 1.25rem; }
  </style>
</head>
<body>
  <h1>Clicks: <span>0</span></h1>
  <button>Click me</button>
  <script>
    let count = 0;
    const btn = document.getElementById("btn");
    const out = document.getElementById("count");
    btn.addEventListener("click", () => {
      count = count + 1;
      out.textContent = count;
    });
  </script>
</body>
</html>
Open it in your browser. Click the button. The number goes up. You just shipped a real interactive webpage, with logic, state, and a visible reaction — not bad for ten lines of JavaScript.
Let us walk through what happens. The HTML gives us a heading with a <span> for the number, and a button. The <script> tag at the bottom of the <body> holds our JavaScript. The script grabs references to the button and the span, then attaches a click listener. Inside the listener, we increment count and update the span's text. Every click re-runs that little block.
Notice the <script> tag is at the end of the body. That is important — if you put it in the head, the script would run before the button has been added to the page, and getElementById would return null. Putting it at the bottom of the body is the simplest way to avoid that. Later you will learn about the defer attribute, which lets you put scripts in the head while still waiting for the page.
Conditionals: making decisions
Right now our code runs in a straight line. But real programs need to make decisions: if the user is logged in, show their profile; otherwise, show a login button. That is what conditionals are for.
const age = 20;

if (age >= 18) {
  console.log("You can vote.");
} else {
  console.log("Sorry, you are too young.");
}
The if keyword takes a condition inside parentheses. If the condition is true, the first block runs. If it is false, the else block runs. You can chain multiple checks with else if:
if (score >= 90) {
  grade = "A";
} else if (score >= 80) {
  grade = "B";
} else {
  grade = "C";
}
Conditions are built from comparisons: >, <, >=, <=, === (equal), !== (not equal). You can combine them with && (and) and || (or). Parentheses work like in maths — use them to make your intent clear.
Loops: doing things many times
Loops let you run the same block of code many times. The most common loop is for...of, which runs a block once for each item in a list:
const fruits = ["apple", "mango", "banana"];

for (const fruit of fruits) {
  console.log("I like " + fruit);
}
That will print "I like apple", then "I like mango", then "I like banana". The for...of loop is the cleanest loop in modern JavaScript — it just walks through a list, one item at a time, no counting required.
There is also while, which keeps going as long as a condition is true, and the classic for loop with a counter, which is older but still common. You will meet all three in real code. Most of the time you will reach for for...of because it is the most readable.
Common pitfalls
Everyone trips on these. Knowing them in advance saves real time and real frustration.
- Using
==instead of===. Always use the strFurther reading
JavaScript documentation quality varies wildly. The three sources we trust for a beginner’s first year of learning are MDN (the official Mozilla reference), the modern tutorial site javascript.info, and the language specification itself.
- MDN JavaScript Guide — the official MDN guide that walks from variables and control flow through to modules, classes, and async programming.
- MDN Web Docs for JavaScript — the MDN landing hub for JavaScript, linking every reference page for built-in objects and operators.
- javascript.info — the most widely recommended modern JavaScript tutorial, free to read in full and regularly updated.
===). It checks both value and type, so"1" === 1isfalse(correct)."1" == 1istrue(a trap). - Forgetting
await. If a function is async and you forget toawaitit, you will get a Promise back instead of the value you wanted. - Putting
<script>in the<head>withoutdefer. The script runs before the page has loaded, sodocument.querySelectorfinds nothing. Put the script at the end of<body>, or use thedeferattribute. - Typos in element IDs.
getElementById("btnn")returnsnull, and the next line crashes. Double-check your IDs — they have to match exactly. - Forgetting that strings are immutable. You cannot change a single character of a string. You have to build a new one.
FAQ
Here are the questions I get asked most often when teaching JavaScript to absolute beginners.
Is JavaScript the same as Java?
No. They are completely different languages. Java runs on servers and inside compiled programs; JavaScript runs in browsers. The names are a relic of 1990s marketing.
Do I need to install anything to write JavaScript?
No — every browser has a JavaScript engine built in. Open the dev tools and click the Console tab. For real projects, a plain-text editor and a browser are enough to start.
What is the difference between let, const, and var?
Use const by default. Reach for let when you need to reassign. Avoid var entirely — it has surprising scoping rules that bite everyone at least once.
How long does it take to learn JavaScript?
The basics take a few weeks. Intermediate bits like async and modules take a few months. The advanced bits take years. You can build real things at every stage.
Where can I practice?
The browser console is your first playground. After that, try our own JavaScript Intermediate article, which pushes you into real-world patterns like fetch and modules.
Why is my code running but nothing happens on the page?
Three likely causes: (1) your JavaScript ran before the HTML it needed was loaded — put the script at the bottom of the body; (2) your querySelector matched nothing — check the selector with the browser's dev tools; (3) you attached the listener to the wrong element.
Homework
Extend the click counter we built earlier. Open your counter.html and add the following:
- A "Reset" button that sets the count back to zero when clicked.
- A "+10" button that adds ten to the count in one click.
- Display a friendly message ("You clicked a lot!") when the count passes 20.
- Use an arrow function for your listeners.
- Use a template literal somewhere to build a message.
Hint: you will need a second and third button, each with its own addEventListener. For the "20 and over" message, an if statement inside the click handler will do the trick. Save the file, open it in your browser, and click around. When you have got all four behaviours working, you have officially graduated from "complete beginner" to "person who can build things."